Why this matters for your
When you hit the brakes, it's a whole system working together. The pads squeeze against the rotors, creating friction that slows your vehicle down. If those rotors aren't in good shape, that whole process gets messed up. You'll feel vibrations, hear grinding, or your stopping distance will just get longer. It's not just about comfort; it's about safety. Properly functioning rotors are critical for predictable and effective braking.
Over time, rotors wear down. They get grooves, heat spots, and sometimes even warp. When this happens, you have a choice: either get them machined smooth again, or just swap them out for new ones. Making the right call depends on a few things, like how much material is left on the rotor and the type of driving you do. It’s not always a cut-and-dry answer, but understanding the options helps you make an informed decision for your vehicle's braking system.
Before you start: when NOT to DIY
While deciding on rotors isn't a complex mechanical job in itself, there are situations where you should definitely leave it to the pros. If you're seeing any of these red flags, get your vehicle to a shop:
- Deep grooves or cracks: If you can catch your fingernail in a groove, or see any cracks, especially near the hub, replacement is the only safe option.
- Excessive runout: If the rotor wobbles significantly when spinning, it's likely warped beyond safe resurfacing limits.
- Below minimum thickness: Rotors have a minimum thickness stamped on them. If yours are already at or below this, they cannot be safely resurfaced.
- Brake fluid leaks: Any signs of leaking brake fluid from the caliper or lines mean a more serious problem than just rotor wear.
- ABS or brake warning lights: These indicate a system fault that needs professional diagnosis, not just a rotor decision.
Step-by-step procedure
Step 1 — Lift and secure the vehicle Start by loosening your lug nuts, but don't take them off yet. Get your vehicle safely up on jack stands. Never work under a vehicle supported only by a jack. Once it's stable, remove the lug nuts and pull the wheel off. Set it aside where it won't be in your way.
Step 2 — Remove the caliper Locate the two caliper guide pin bolts on the back of the caliper. These usually take a wrench or socket. Remove those bolts. Once they're out, the caliper should slide off the rotor. Don't let it hang by the brake hose; use a bungee cord or a piece of wire to suspend it from the suspension or frame. You don't want to stress that hose.
Step 3 — Remove the caliper bracket Next, you'll need to remove the caliper bracket. This is usually held on by two larger bolts. These bolts are often quite tight, so you might need a breaker bar. Once those bolts are out, the bracket will come off. Sometimes, the abutment clips will stick to the bracket or even the old pads. I always replace these clips with new ones when doing any brake job, whether it's just pads or a full rotor replacement. They're cheap and prevent rattles.
Step 4 — Remove the rotor With the caliper and bracket out of the way, the rotor should now slide straight off the wheel studs. Sometimes, especially if it's been on there a while, it might be seized to the hub. A few firm taps with a rubber mallet on the hat of the rotor, between the studs, usually frees it up. If it's really stuck, you might need to use a larger hammer and a block of wood to protect the rotor, hitting the face from the back.
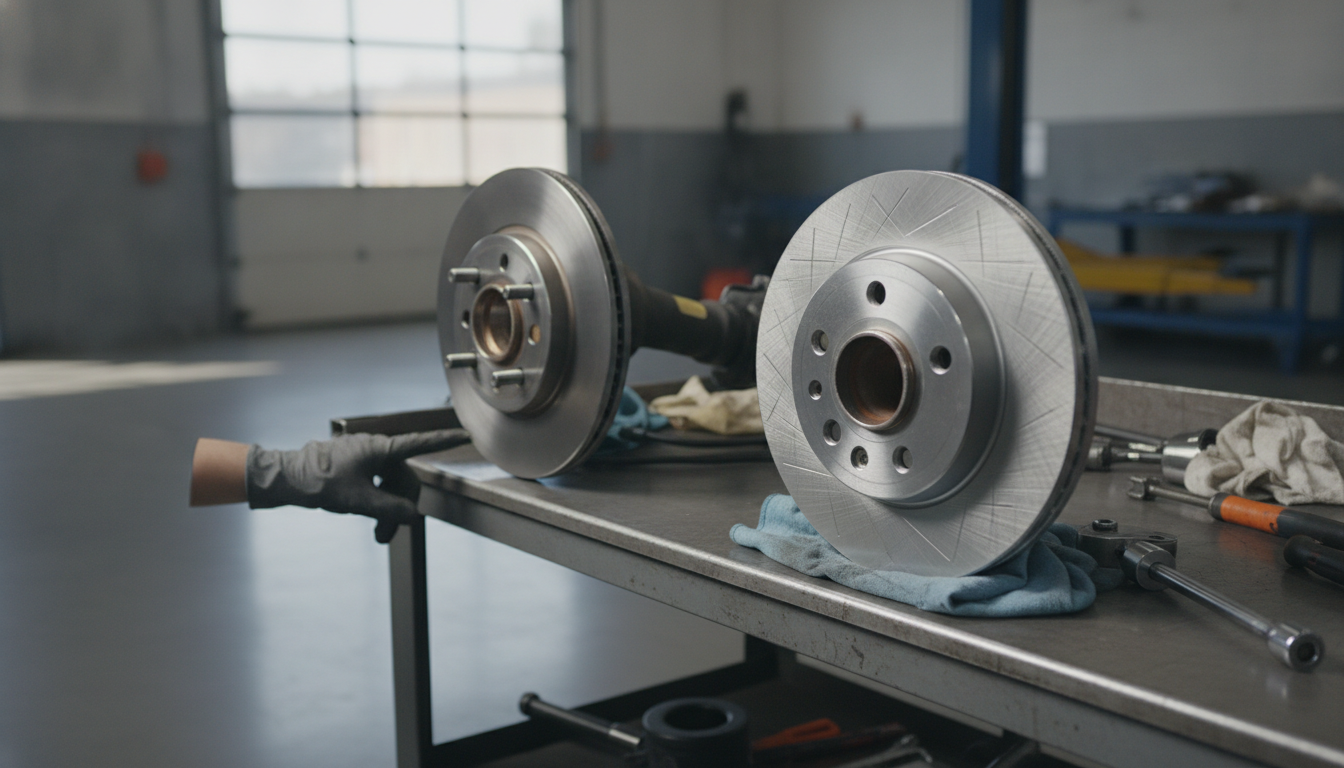
Step 5 — Inspect the old rotor Now you've got the rotor off. Look at it closely. Are there deep grooves? Are there any visible cracks? Is it discolored in spots, indicating excessive heat? Most importantly, measure its thickness with a micrometer. Compare that measurement to the minimum thickness specification, which is usually stamped on the rotor itself, or you can find it in your vehicle's service manual. If it's below that minimum, or if it has deep cracks, it's time for a new rotor. No question.
Step 6 — Decide: resurface or replace? If your rotor is above the minimum thickness and only has minor surface imperfections, light rust, or shallow grooves, you might be able to get it resurfaced. This involves taking it to a machine shop or a parts store that has a brake lathe. They'll shave a small amount of material off both sides to make it perfectly flat and smooth again. If the rotor is significantly warped, has deep grooves, or is already close to that minimum thickness, replace it. Don't cheap out here. A new rotor ensures optimal braking performance and safety.
Step 7 — Prepare the hub Whether you're installing a new rotor or a freshly machined one, it's crucial to clean the hub surface. Use a wire brush or sandpaper to remove any rust or debris from the mating surface where the rotor sits. This ensures the new or resurfaced rotor sits perfectly flat against the hub, preventing future runout and vibrations. A clean hub is a happy hub.
Step 8 — Install the new or resurfaced rotor Slide the rotor onto the wheel studs. It should sit flush against the clean hub. If it doesn't, re-clean the hub. You can put a single lug nut on finger-tight to hold it in place while you work.
Step 9 — Reinstall the caliper bracket Mount the caliper bracket back onto the steering knuckle. Tighten the bracket bolts to factory specifications. Consult your service manual for the exact torque values for your vehicle. These are critical fasteners, so don't guess.
Step 10 — Install new brake pads Now, install your new brake pads into the caliper bracket. Make sure the new abutment clips are in place. Apply a thin layer of silicone-based brake grease to the contact points where the pads slide in the clips, and on the back of the pads where they touch the caliper piston and outer caliper body. This helps prevent noise and ensures smooth movement.
Step 11 — Reinstall the caliper Before putting the caliper back on, you'll likely need to compress the piston(s) to make room for the thicker new pads. Use a C-clamp or a piston compressor tool for this. Slowly push the piston(s) back into the caliper body. Once compressed, slide the caliper over the new pads and rotor. Reinstall the caliper guide pin bolts and tighten them to factory specifications. Again, consult your service manual for these torque values. Make sure the brake hose isn't twisted.
Step 12 — Reinstall the wheel and lower the vehicle Put your wheel back on. Hand-tighten the lug nuts. Lower the vehicle until the tire just touches the ground, then tighten the lug nuts in a star pattern to the manufacturer's specified torque. Once fully lowered, give them a final check. Before you even think about driving, pump the brake pedal several times until it feels firm. This reseats the caliper pistons against the new pads.
Bedding-in the new pads
After any brake job, whether you resurfaced or replaced your rotors, you need to bed in the new pads. This process transfers a thin, even layer of pad material onto the rotor surface, which is crucial for optimal performance and preventing noise. The general procedure is to do 15 to 20 medium-firm stops from about 50 mph down to 30 mph. Between each stop, drive for about 30 seconds without braking to allow the brakes to cool down a bit. Avoid coming to a complete stop during this process if possible, as it can imprint pad material unevenly. After these stops, drive normally for a bit to let everything cool completely. Avoid hard braking for the first couple hundred miles.
How often to replace front brake pads
Brake pad life varies wildly depending on your driving style, vehicle, and pad material. Generally, front brake pads last anywhere from 30,000 to 70,000 miles. Some aggressive drivers might see less, while highway cruisers might get more. The key is to pay attention to warning signs. If you hear squealing, grinding, or feel vibrations when braking, it's time for an inspection. Many pads also have wear indicators that will make noise when they're getting low. Don't wait until you hear metal-on-metal grinding; that means you're damaging your rotors.
Top picks


Frequently asked questions
What is the main difference between resurfacing and replacing rotors?
Resurfacing involves machining a small amount of material off the rotor surface to make it smooth again, while replacing means installing a brand new rotor. Resurfacing is for minor imperfections, replacement for significant wear or damage.
How do I know if my rotors can be resurfaced?
You need to measure the rotor's thickness. If it's above the manufacturer's minimum thickness specification and only has minor grooves or surface rust, it's a candidate for resurfacing. Deep grooves, cracks, or warping usually mean replacement.
Is resurfacing rotors cheaper than replacing them?
Generally, yes. The labor cost for machining is typically less than the cost of new rotors plus installation. However, if the rotor is too thin to resurface, replacement is the only safe option, making it the necessary long-term cost.
Do I need new brake pads if I resurface my rotors?
Yes, absolutely. Always install new brake pads whenever you resurface or replace rotors. New pads are essential for proper bedding-in, optimal braking performance, and to prevent premature wear or noise from old, unevenly worn pads.